how to upload my website online after design with wamp offline
Practice you think it's the right time to innovate your site to the earth? If you checked your local site thoroughly, you tin make information technology live unreluctantly. Every bit here you will get all you need, and how to move WordPress from localhost to alive server. Let'south start!
How to move WordPress from localhost to alive server?
It's really good to build a website locally for the speedy development. Even, it saves you from unnecessary headaches of breaking your site while troubleshooting. You tin safely exam your site for changes and make your workflow more efficient. Once you are satisfied with the design of the website, you can transfer it to the live server. It is quite simple though sounds tough. Hither I volition give you all the details to "How to movement WordPress from localhost to alive server".
Offset things commencement. You demand a hosting programme to upload your WordPress website, did you sign up with a hosting provider? I volition recommend Bluehost if you are searching for a perfect hosting visitor that offer budget plans with 99.ix percent uptime guarantee. It is i of the oldest hosting company in the earth.
Get Bluehost Hosting
Methods to Move WordPress from Localhost to live Server and Publish Website
Get-go of all, yous will design and test your WordPress website on localhost. For that, you need to install WordPress & XAMPP. For details about setting upward a local surroundings, y'all tin can refer our article on how to install WordPress and XAMPP locally. One time you are certain about the performance of your website, you lot can move it to the server. Yous may read about best WordPress hosting providers. You have two master methods to migrate your site from localhost to server –
- Manual Method
- Using Plugins
Bold, yous have a domain proper noun and spider web hosting, let's see the step by step process to make your site live on the server:
1. Transmission Method: How to motility WordPress site from localhost to live Server
To move your WordPress site manually, y'all will first consign information technology via phpMyAdmin.
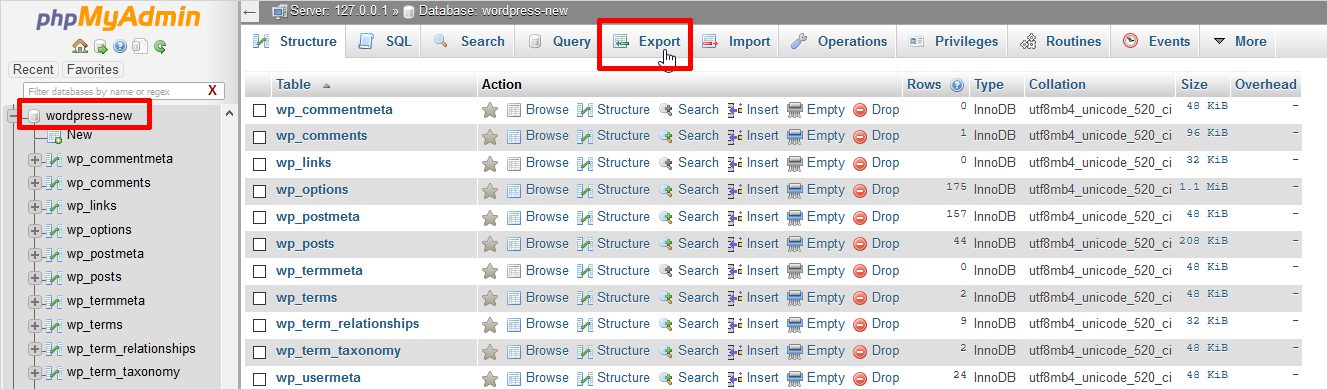
Step 1: Export Local WordPress Database
For exporting your database, but navigate to http://localhost/phpmyadmin/ and select your WordPress database. Next, click Consign push button from the top carte du jour bar.
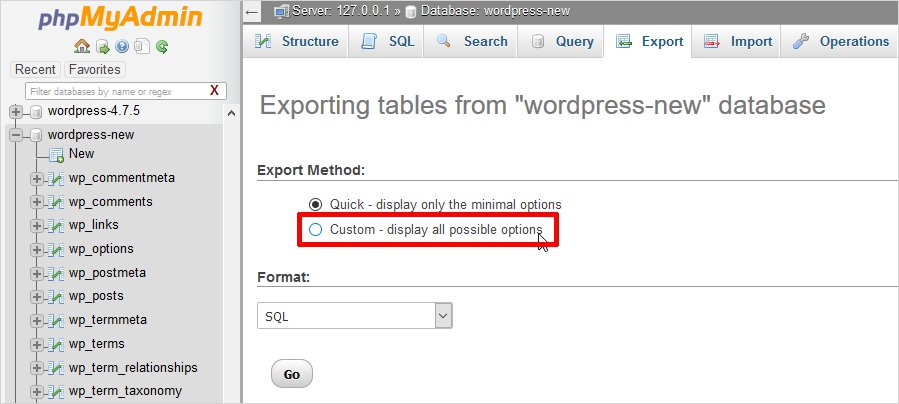
Y'all volition detect two options here – Quick and Custom. Custom volition requite you more options to consign your database.
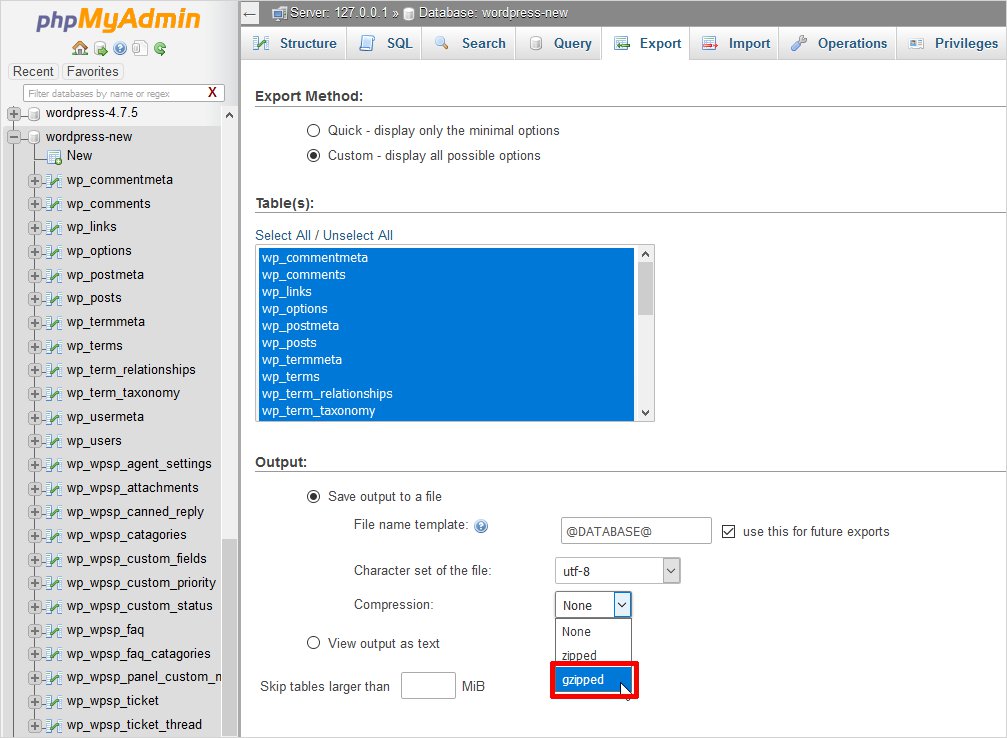
If you are choosing Custom, brand certain that all the tables become selected. Cull the gzipped course of compression for the output file. The gzipped compression is mainly used for large database files.
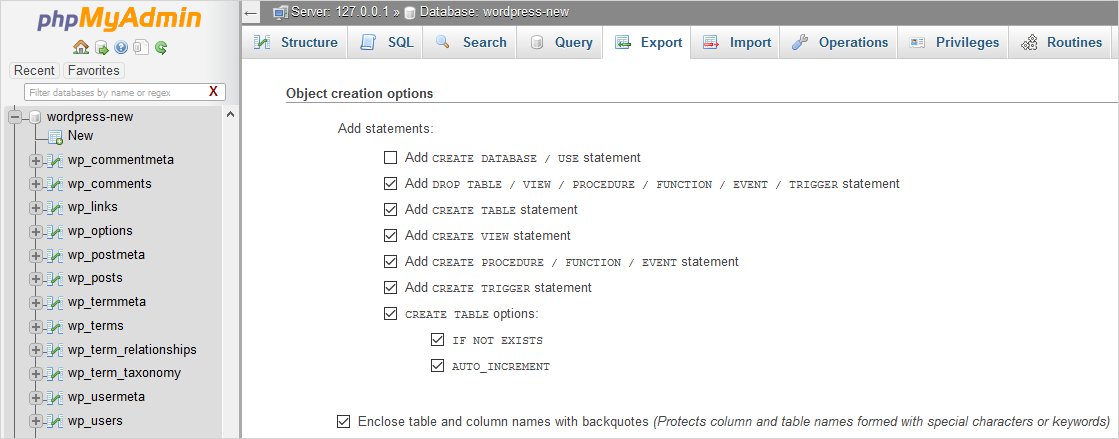
Nether Format-specific options, select structure, and information. Also, check the post-obit boxes:
- Add Drop Table / VIEW / PROCEDURE / Function statement
- IF Not EXISTS
- AUTO_INCREMENT
- Enclose table and column names with backquotes
Once done, click Go button to download the database file.
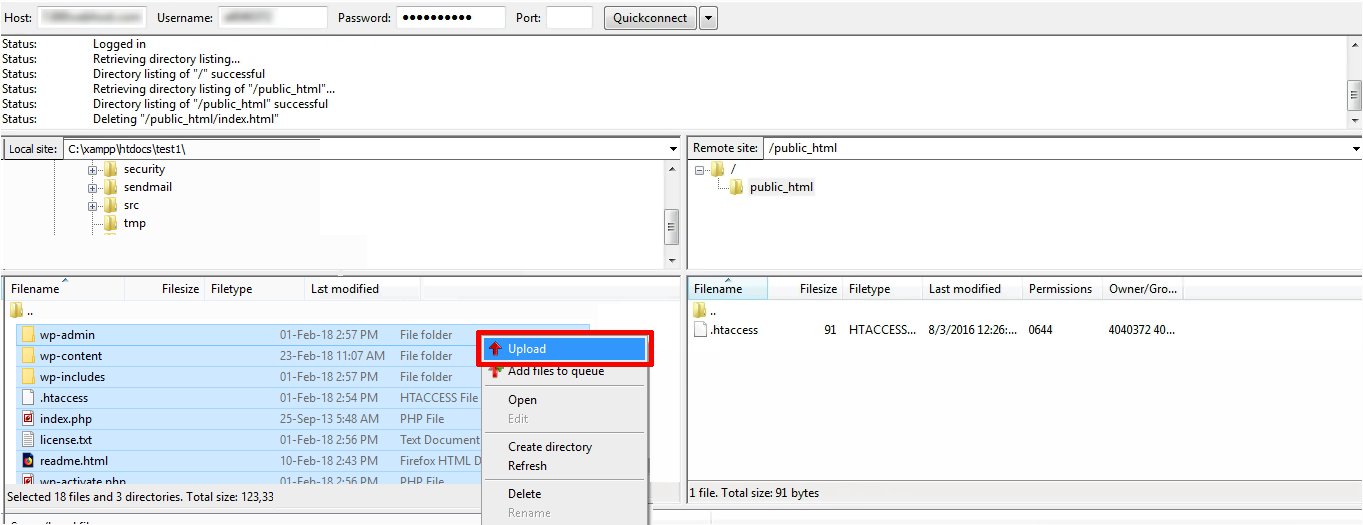
Step two: Upload WordPress Files to Live Site
To move your WordPress files, open your FTP client. For demonstration purpose, we are using FileZilla FTP client here. First, connect to your web hosting account and browse the root directory of your alive server. And so, Upload all the files in the right destination directory. For case, if yous want to host the site on mysite.com, then upload all files in public_html directory. You will get an inbuilt File Transfer feature on your CPanel if you are using a good Web Hosting like Bluehost or SiteGround.
Step 3: Create New Database on Live Site
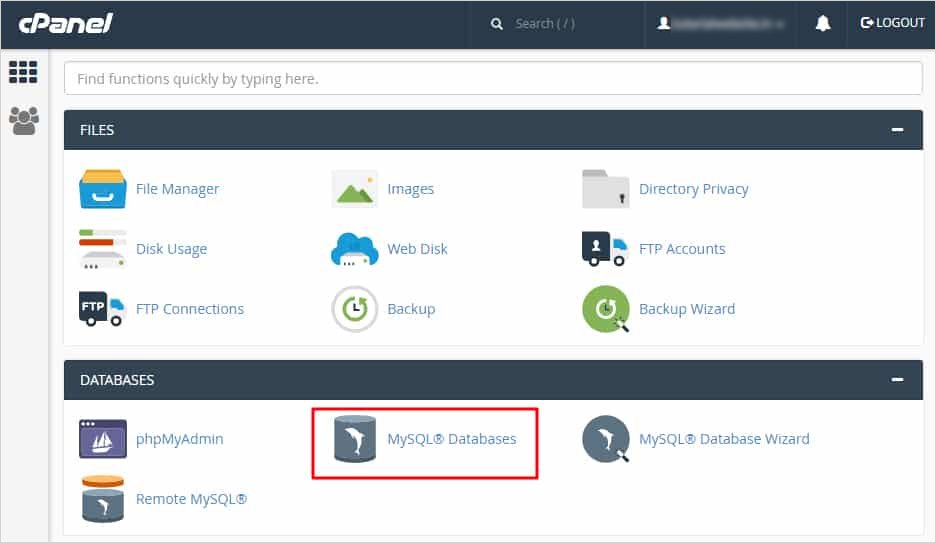
Your WordPress files volition take a while to upload, meanwhile import the database saved to your hard bulldoze in the first step. Hosting providers offer different ways to do and so. Some practice it through phpMyAdmin & some via cPanel. The cPanel is more pop and so we are creating a database via cPanel here.
Commencement of all, log in to your cPanel dashboard. Click the MySQL Databases icon in the databases department. Summit Hosting providers i.eastward. Bluehost generally provide a straight link to the CPanel login in the first signup email, otherwise you can also observe it from your hosting admin.
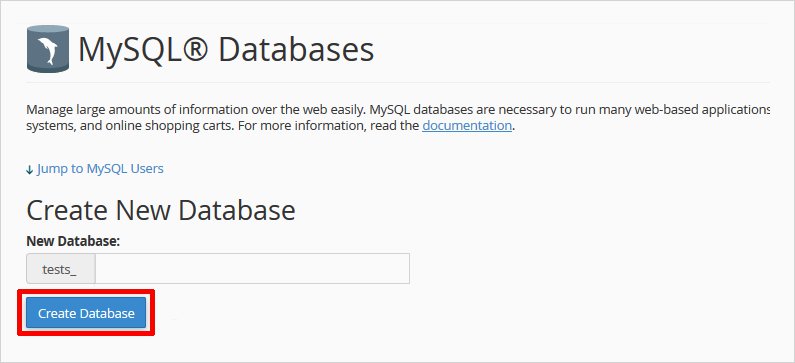
From the next screen, you will create a database by specifying its name.
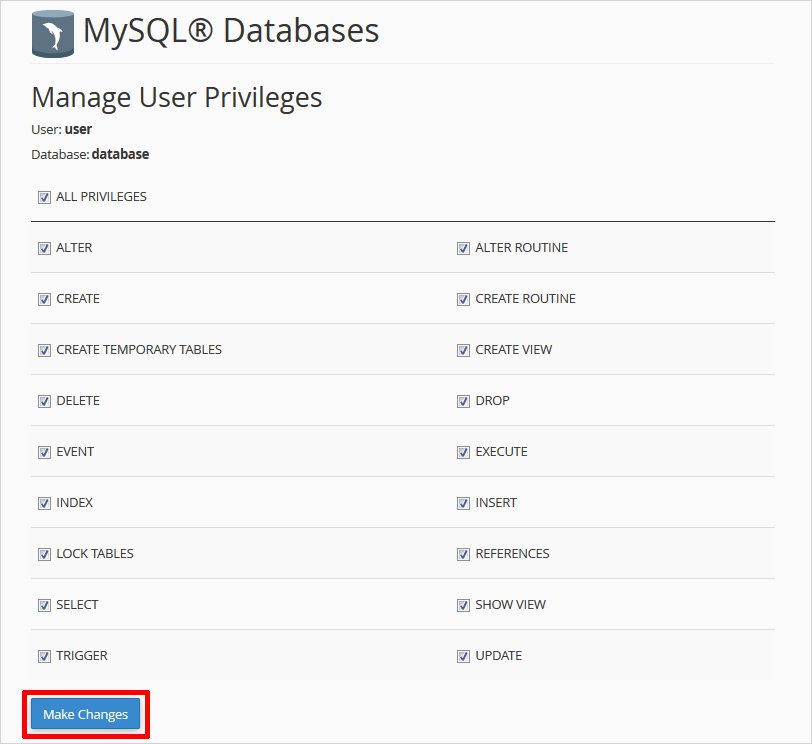
After creating a database, navigate to the MySQL Users section. Here, create or add together an existing user to the database.
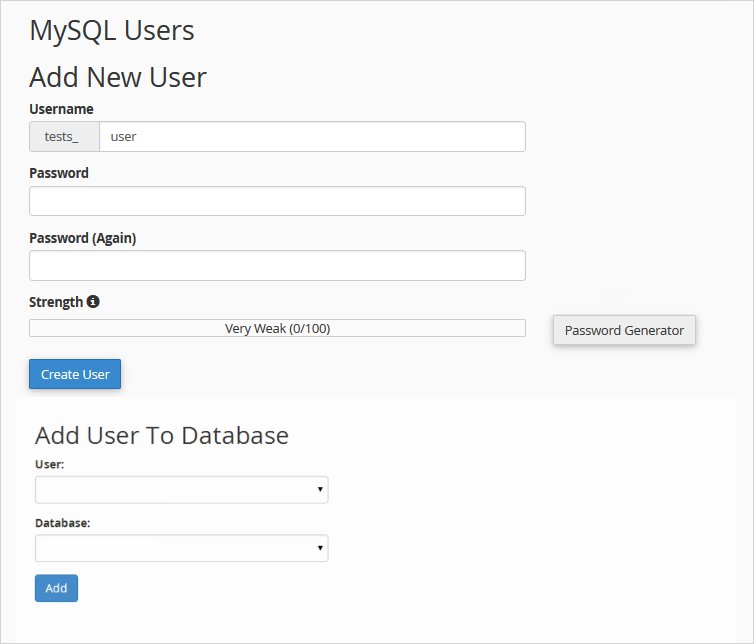
cPanel will take y'all to set MySQL privileges for that user. Now, grant all privileges to the user by checking every box. Then, click Make Changes button.
Step iv: Import Local Database on Live Site
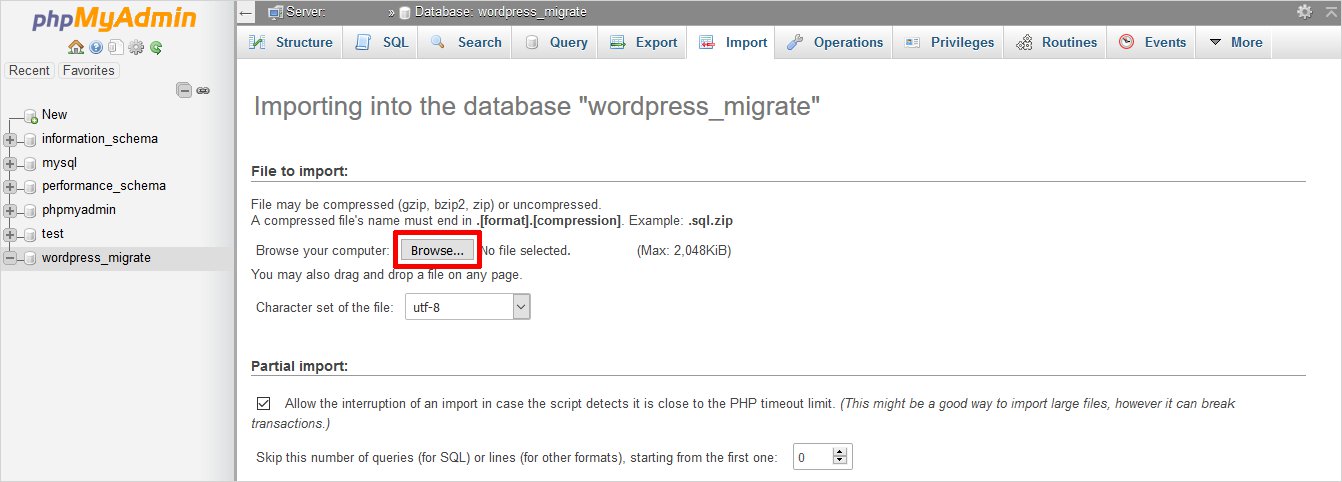
Go to your cPanel dashboard to import your WordPress database. Navigate to database section and select phpMyAdmin. Now, you lot can see your newly created database in phpMyAdmin. Go to Import page past clicking the Import Tab on the top bar bill of fare. Adjacent, click on Scan push to cull the database file created in step 1.
 And then, printing Become to import your WordPress database.
Pace 5: Redirect the Site URLs
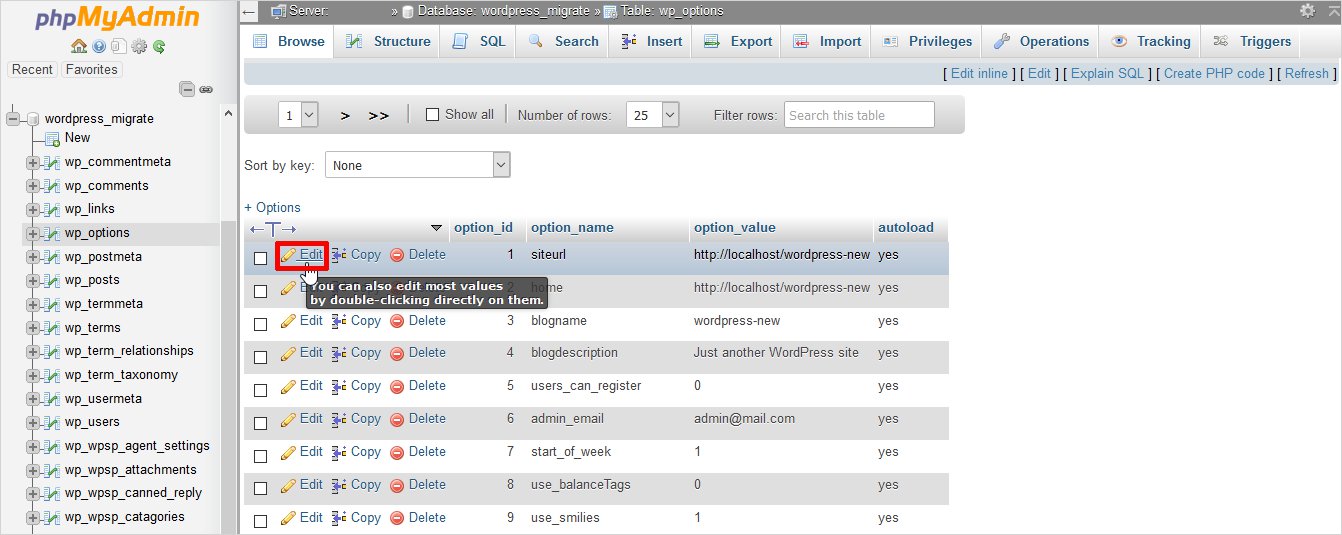
Now, you accept to supplant all the links in the database contained within are still pointing to the old site location. In phpMyAdmin, expect for the wp_options table in your database. Click Browse button or the link in the sidebar to open the page with a list of fields within the wp_options table. Under the options_name file, yous need to look for siteURL. Click Edit choice that will open up an edit field window.
In the input box for option_value, you can run into the URL of your local install similar http://localhost/test. Supercede information technology with your new site URL in this field, for case, http://www.templatetoaster.com.
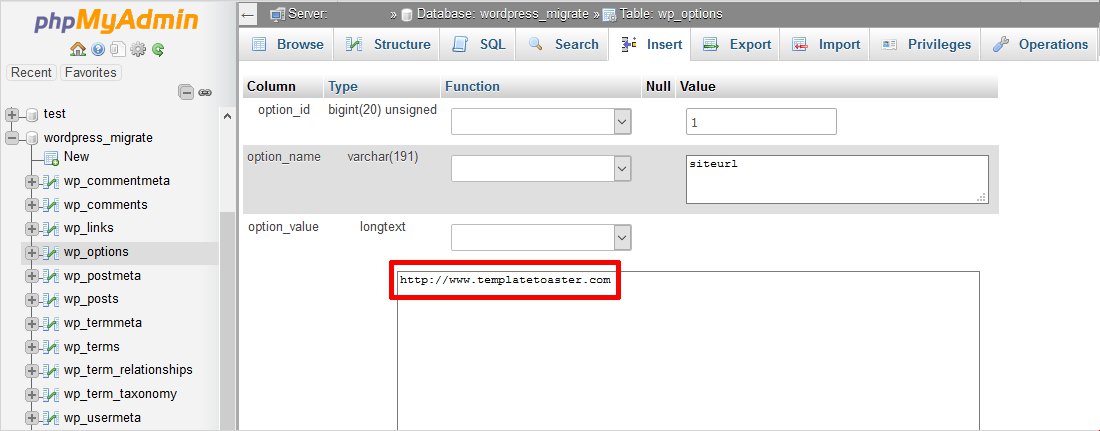
Relieve the changes by clicking the Go button.
Side by side, you volition echo the same steps for the option name: dwelling house. So, merely discover the domicile tab in the wp_options page. Update the abode URL to be your site URL.
You can likewise Find and replace all instances via a plugin like Velvet Blues. Refer to this detailed tutorial on how to change Mass URLs for a website.
Step 6: Ready Up Your Live Site
Once you import the database, it'south time to configure wp-config.php. Connect to your website using an FTP client, discover wp-config.php file and right click to View/Edit. Wait for the information:
define('DB_NAME', 'your_database_name');
define('DB_USER', 'your_database_user');
ascertain('DB_PASSWORD', 'your_database_password');
define('DB_HOST', 'localhost');
Provide the database name, user, and countersign y'all created in the earlier footstep. After that, save the wp-config.php file and upload it dorsum to your server. Your website should be alive now then you can log in. Move to Settings » Full general and without changing anything, Click Save Changes button. It will ensure that the site URL is corrected wherever needed.
Go to Settings → Permalinks, choose your preferred URL structure and salvage it to ensure all mail links are working well.
Step 7: Fix Images and Broken Links
Whenever y'all movement from local server to a alive site, information technology is obvious to get some cleaved links and missing images. Y'all can either use the SQL queries or use the Velvet Dejection WordPress plugin to fix these.
If you choose SQL, go to phpMyAdmin. Click on your database and printing SQL from the elevation bill of fare. Write this query:
UPDATE wp_posts Ready post_content = Supplant(post_content, 'localhost/test/', 'www.mylivesite.com/');
Supplant the local site and live site URLs with your own.
That is it !! You have successfully migrated your site to the live server manually.
2. Brand Website Live Using Plugins
The second most convenient and comparatively easier mode to migrate your site is by using WordPress plugins. There are many plugins available in WordPress repository for the aforementioned. But two almost reliable and pop plugins are All-In-1 WP Migration and Duplicator. Let's see the step by step procedure to transfer a site using both one by ane:
All-In-One WP Migration plugin
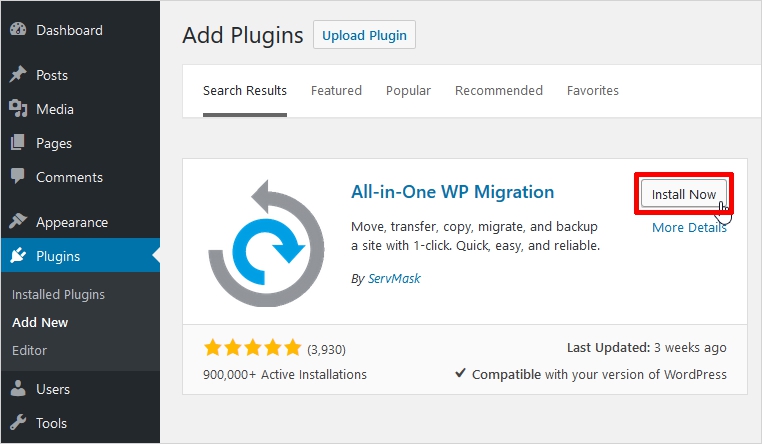
It is a popular plugin with more than 900,000 active installs and a rating of iv.8. Information technology exports your WordPress website including the database, media files, plugins, and themes. You need no technical knowledge for this. The steps you will follow to migrate your site to a alive server are as:
Stride 1: Install and Actuate the plugin.
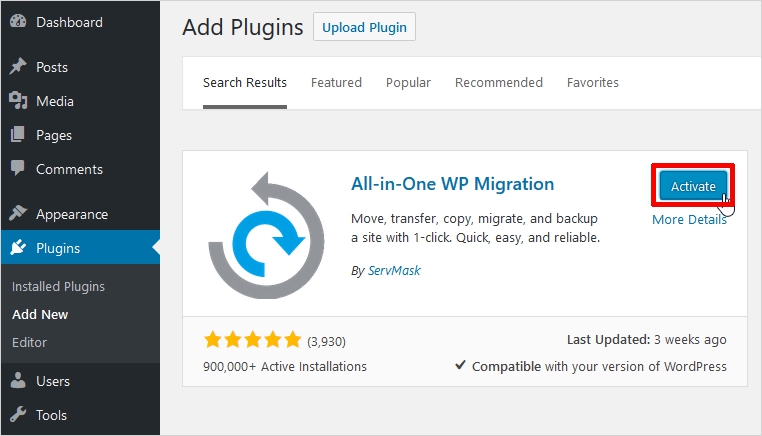
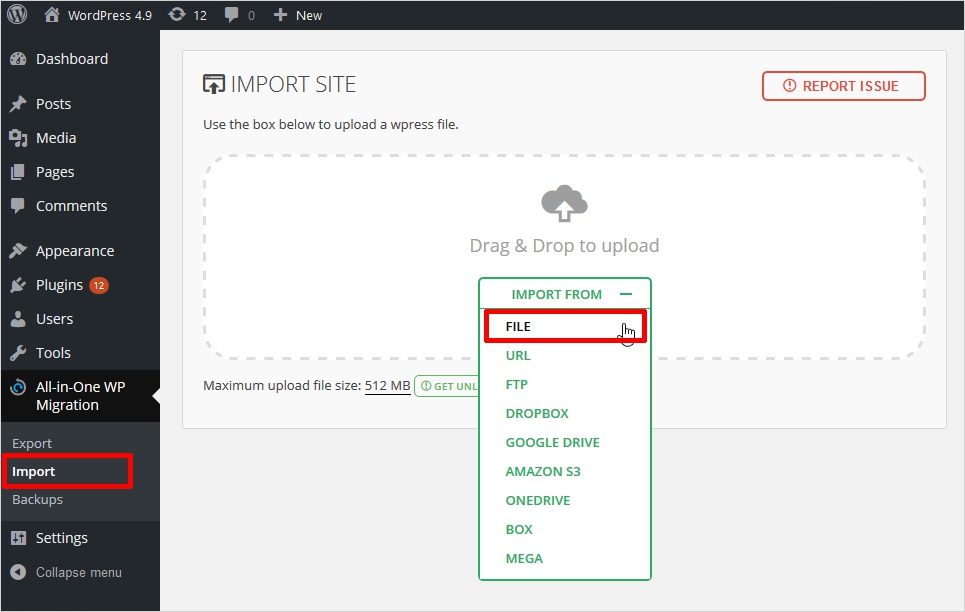
Step ii: Subsequently activating it, you lot can see an option named All-in-One WP Migration in the left pane of your WordPress Dashboard. Click on Export and information technology will open an Export Site window as shown below.
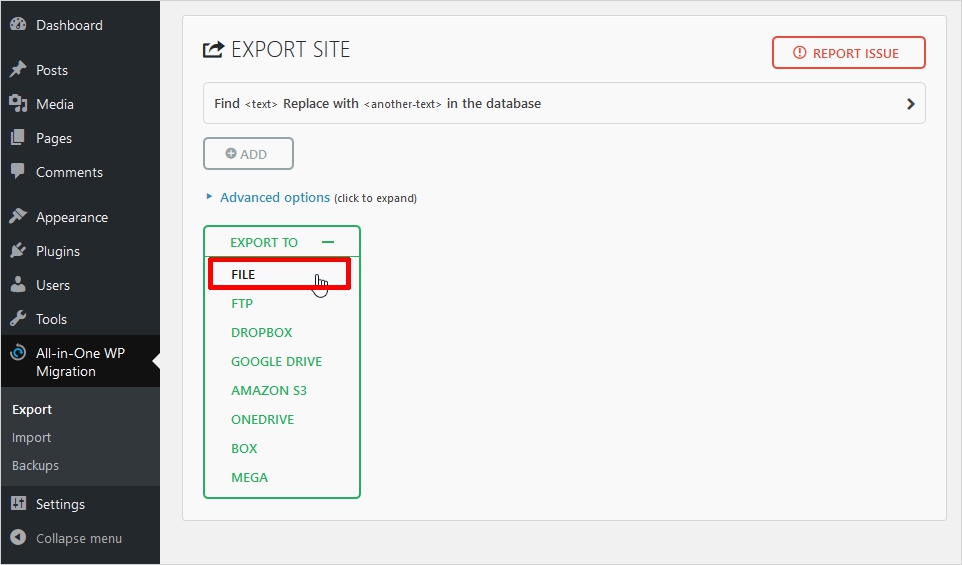
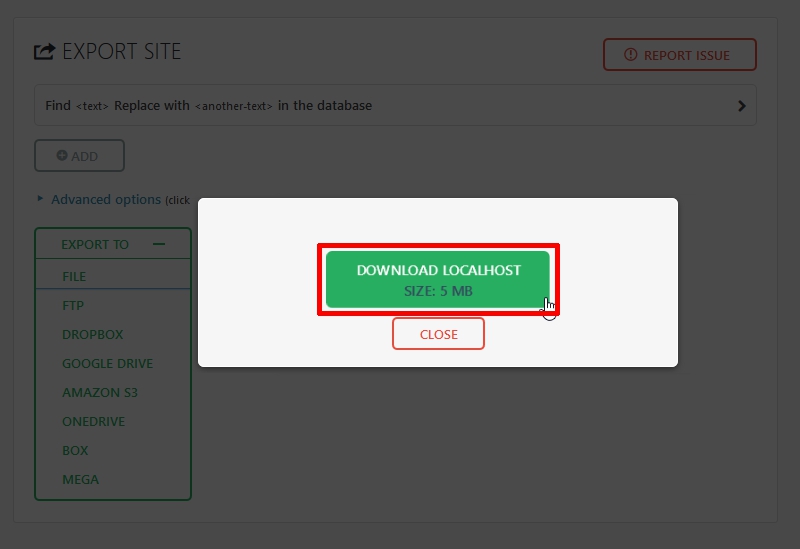
Here, it will ask you about the format in which you want to Export your localhost site. Suppose you select File. then, it will prompt y'all to Download Localhost with information of file size as shown beneath.
Click Download Localhost.
Step 3: Now, log into cPanel. Install WordPress on the destination server and then, All-In-1 WP Migration plugin from the dashboard. Activate it. Once activated, navigate to left pane of the dashboard and Click Import option under All-In-One WP Migration department.
Here, select the same format to Import the local site as selected in Step 2.
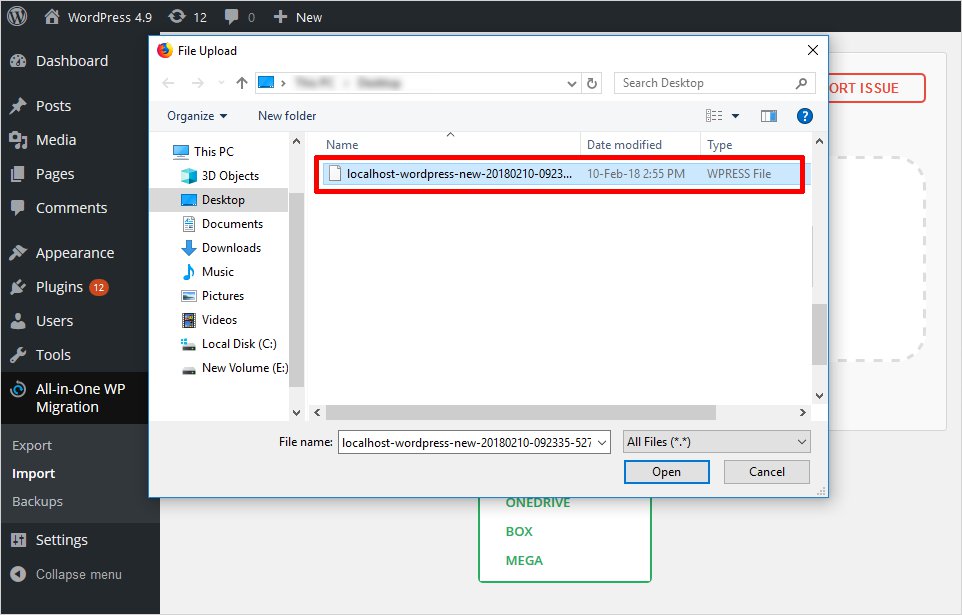
Step 4:Select the database file you created in step 2 from the browse button equally shown below.
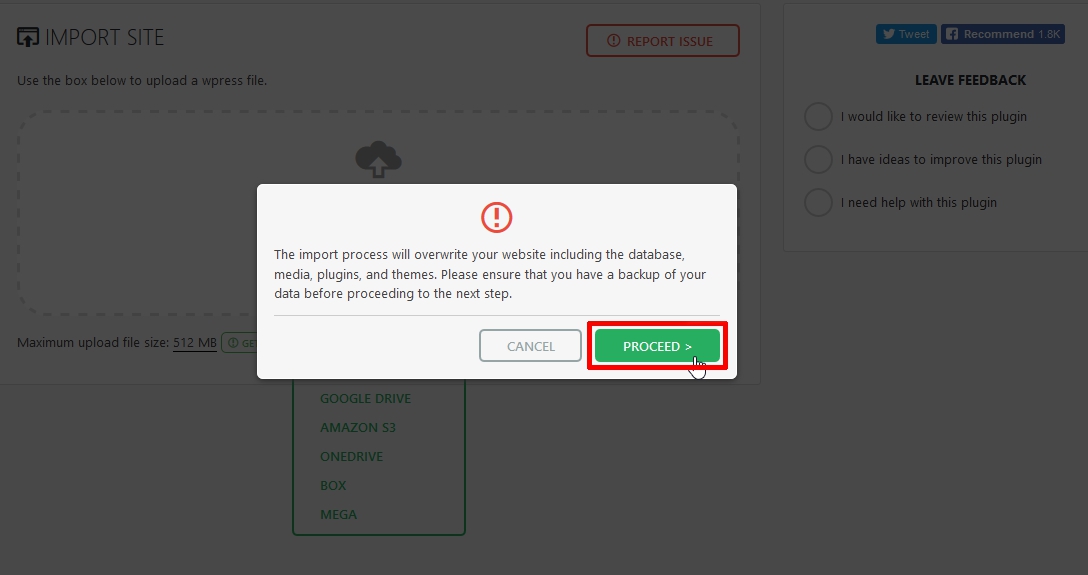
Step 5: Information technology will prompt you lot before Importing the localhost file as shown below. If you have taken the backup of your site and sure to move it, click Proceed.
That's it!! Your site is live now. Information technology is really uncomplicated to move your site from localhost to server with All-In-I WP Migration.
Duplicator WordPress plugin
It is another one if the best migration plugins with 1+ meg agile installs and a 4.9-star rating. Let's see how to utilise it to move your WordPress site from localhost to a web server:
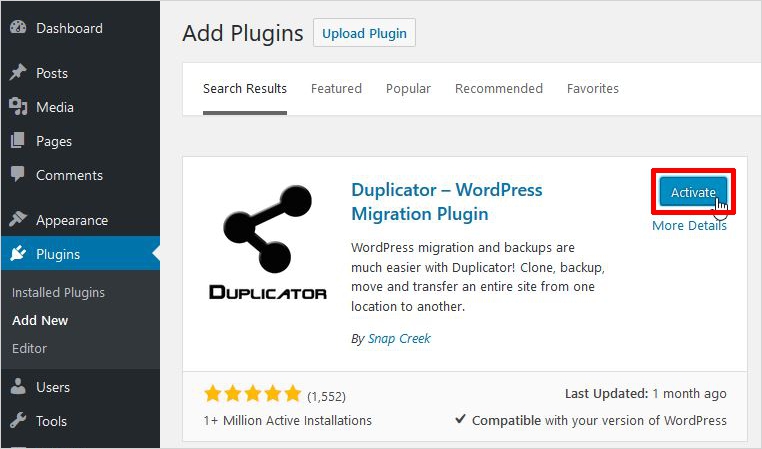
Step 1: Download and Install Duplicator on your localhost site from the WordPress plugin repository.
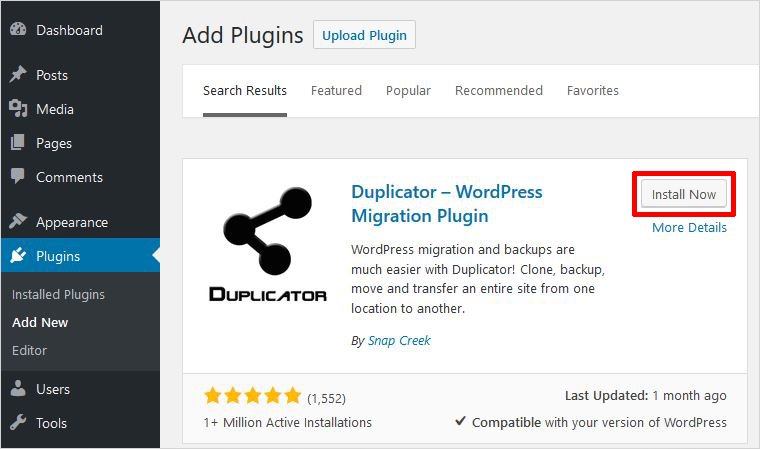
One time installed, activate it.
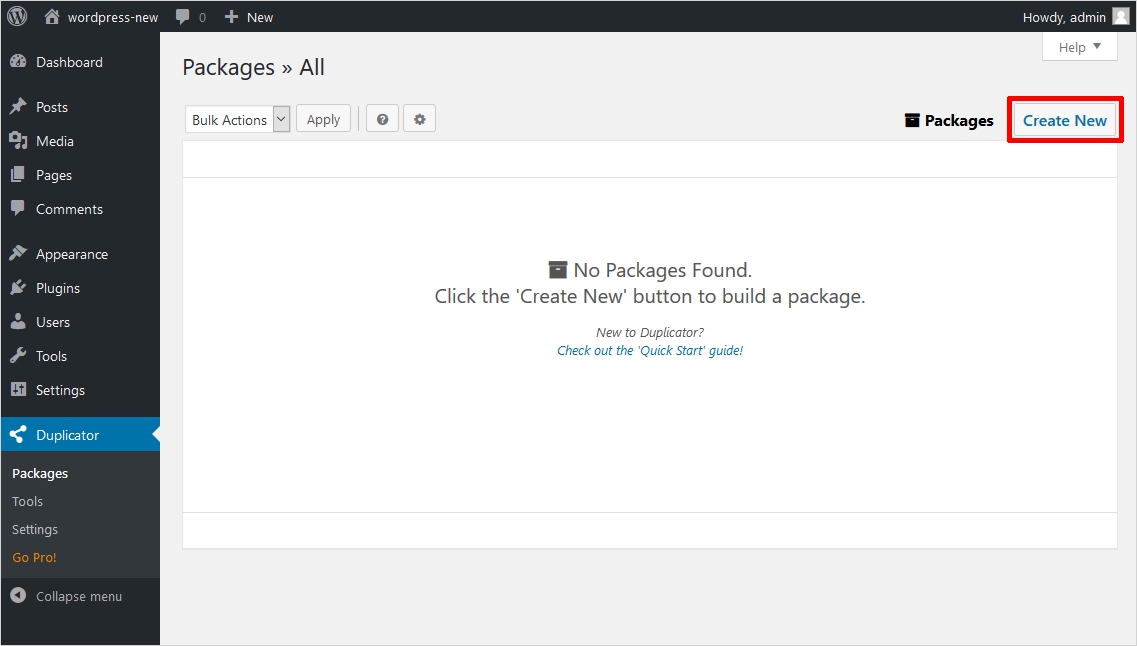
Footstep ii: Now, you tin can see a Duplicator section in the left pane of your WordPress dashboard. When you click on Packages, it volition display No Packages Found. As you take just installed the plugin and no packages are available here.
A package will include an archive and an installer file that automates the process of setting upwards your site on another server.
Then, click "Create New" to create a package.
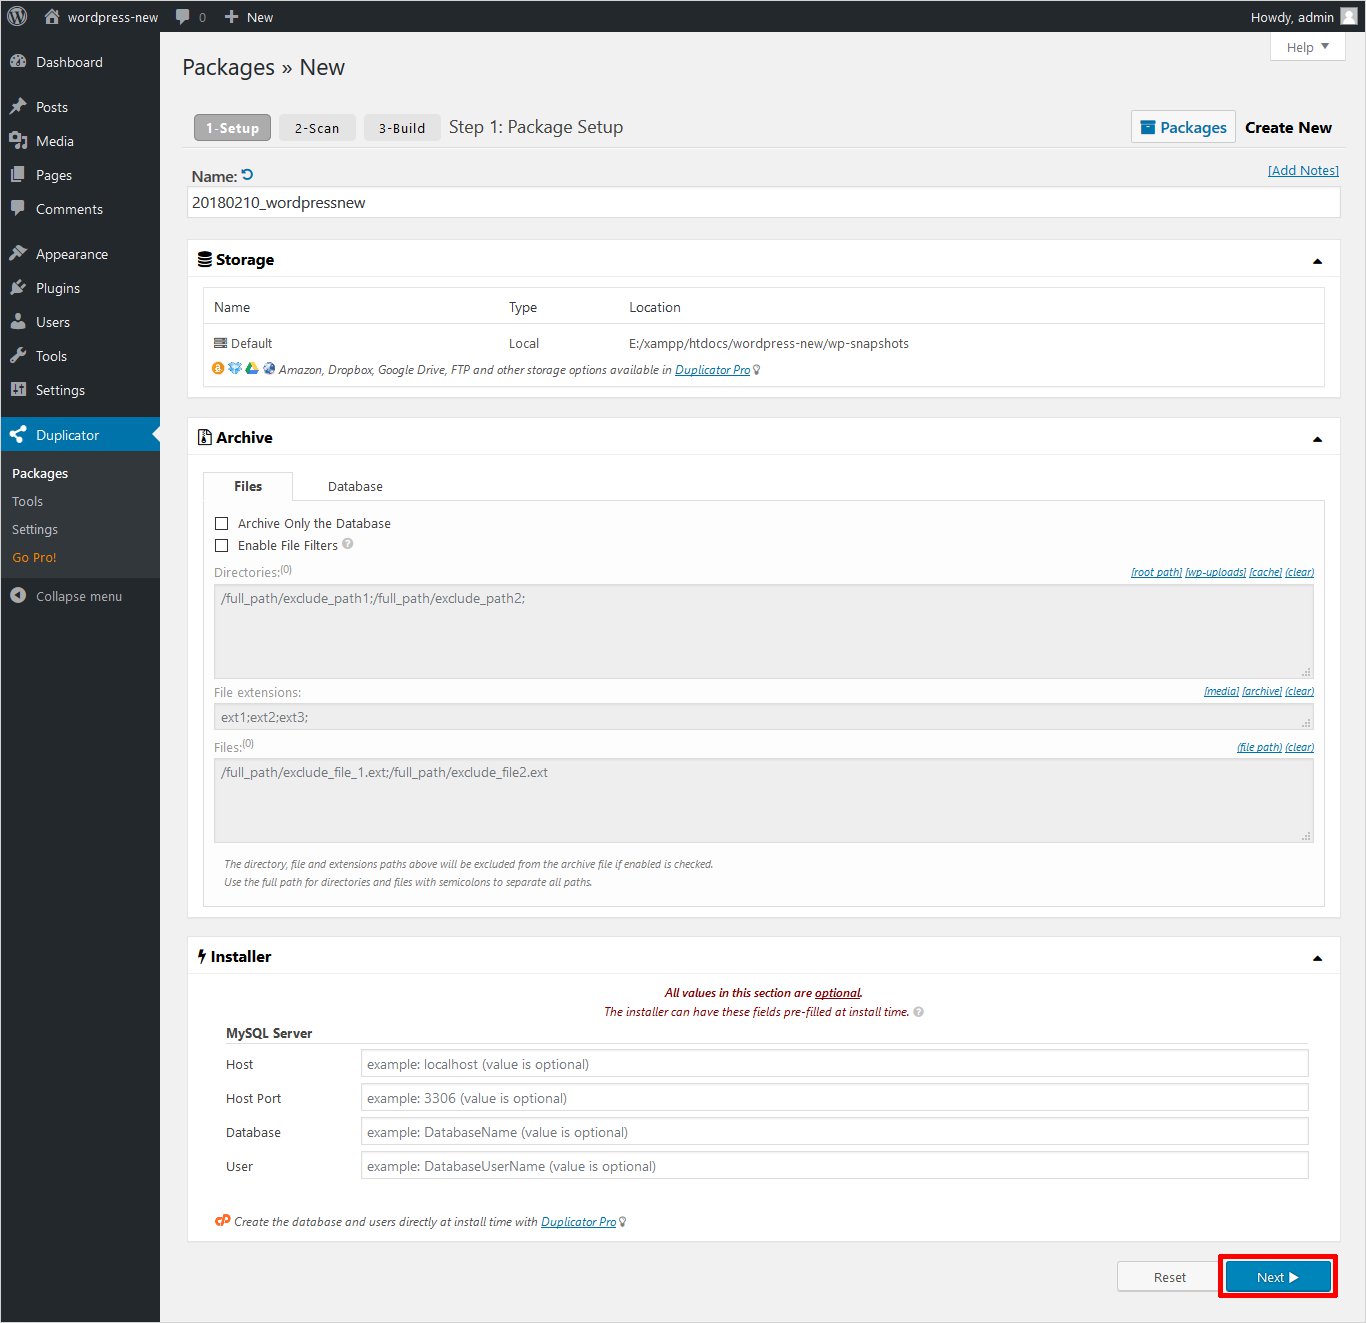
Stride 3: The adjacent screen will prompt to specify the name of your package and making a few notes. It's not necessary to proper noun your package, though you tin give information technology a memorable title. Also, add a few notes if you desire to.
At that place are also some optional Annal and Installer settings. The Archive settings allow you to filter your database. Whereas the Installer options are used to pre-make full the Installer screen to set up setup at install time for time to come. It volition speed up your overall install process.
Then, click "Adjacent".
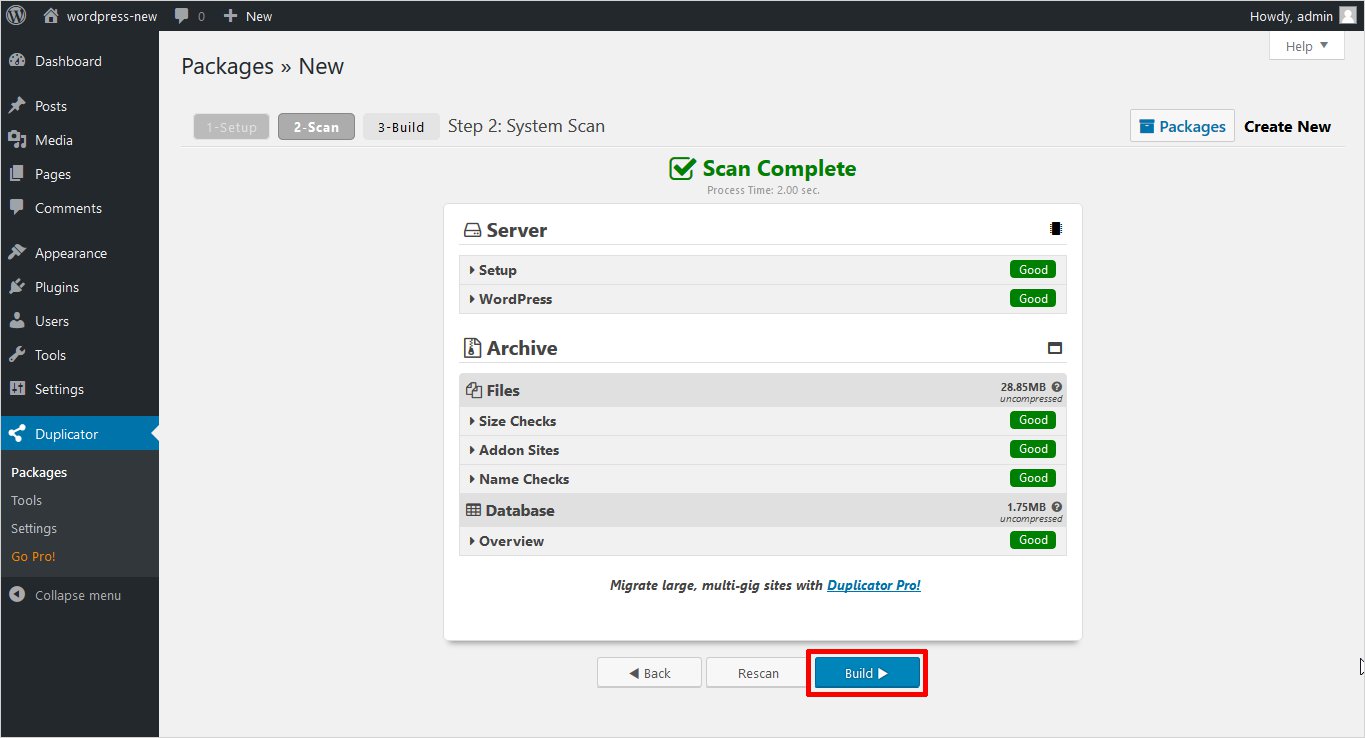
Footstep iv: Duplicator will now run a system scan to ensure the smooth processing of package building. It will as well determine the potential bug. More than "Warn" checks indicates that you lot volition run across issues during the build and install phases.
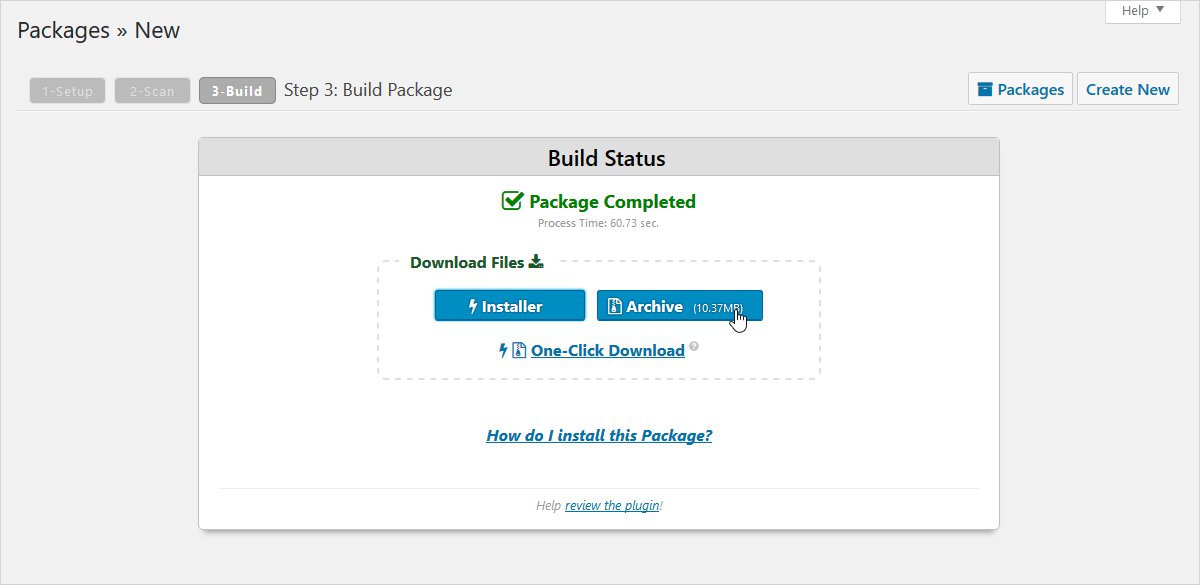
Now, press Build to create your package. It will showtime backing upwardly your site.
Step 5: The plugin will produce two files after throwing a parcel completion message. These files are – an archive of your site as a .Nada file and an installer file as a .PHP file. Download both files.
Footstep 6: Now, yous demand to install and unpack your packaged site. For that, you volition re-create the downloaded files in the before step to my live site'south directory. Yous can use an FTP application like FileZilla for this.
Step 7: Login to your site via FTP and navigate to your public_html folder. Copy the archive and installer files here from your desktop. It can take a little longer.
Step viii: Next, yous will install the archived site on the alive server. For that, admission the installer by adding /installer.php to the domain. It will validate first, all the files copied.
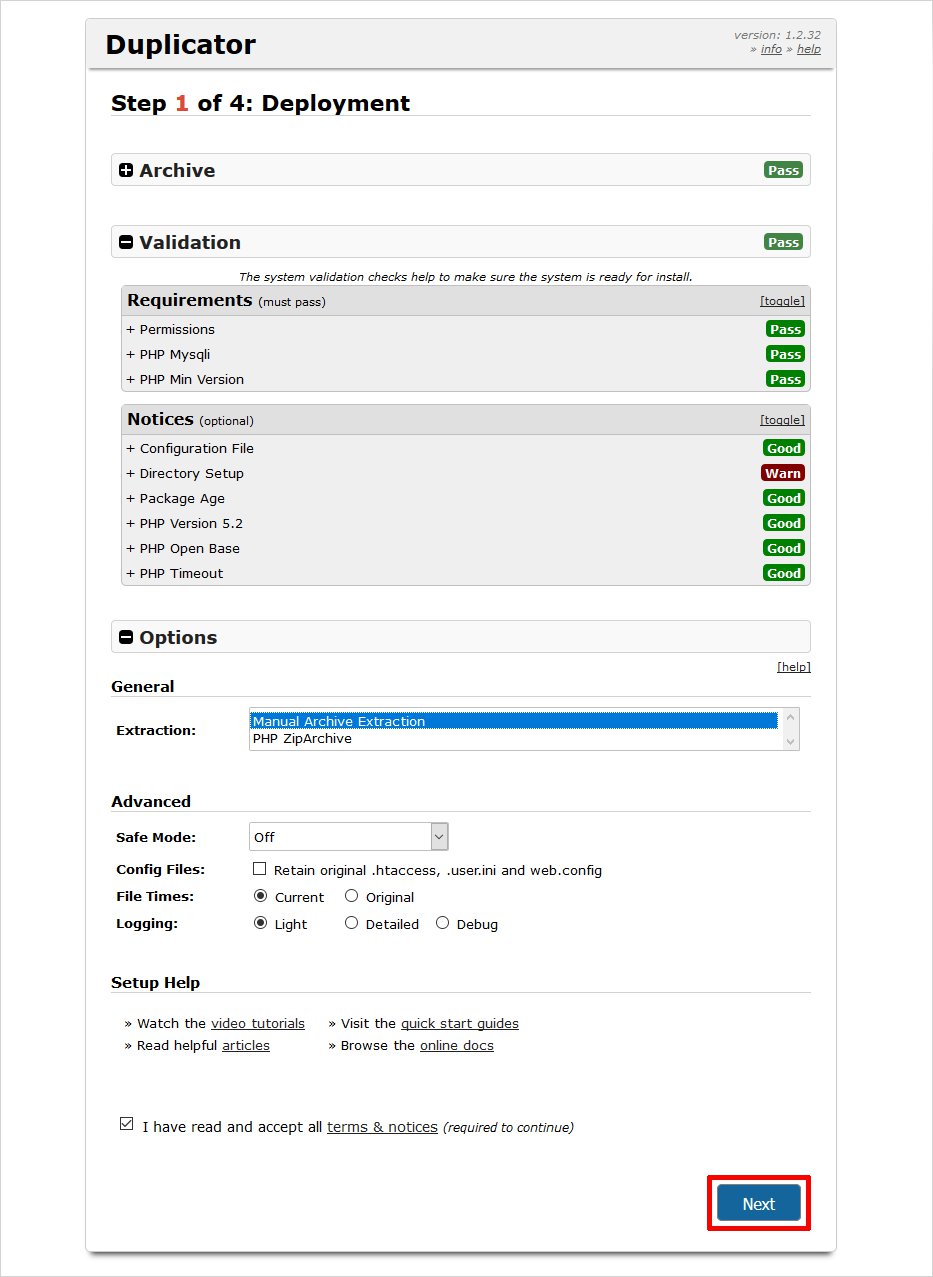
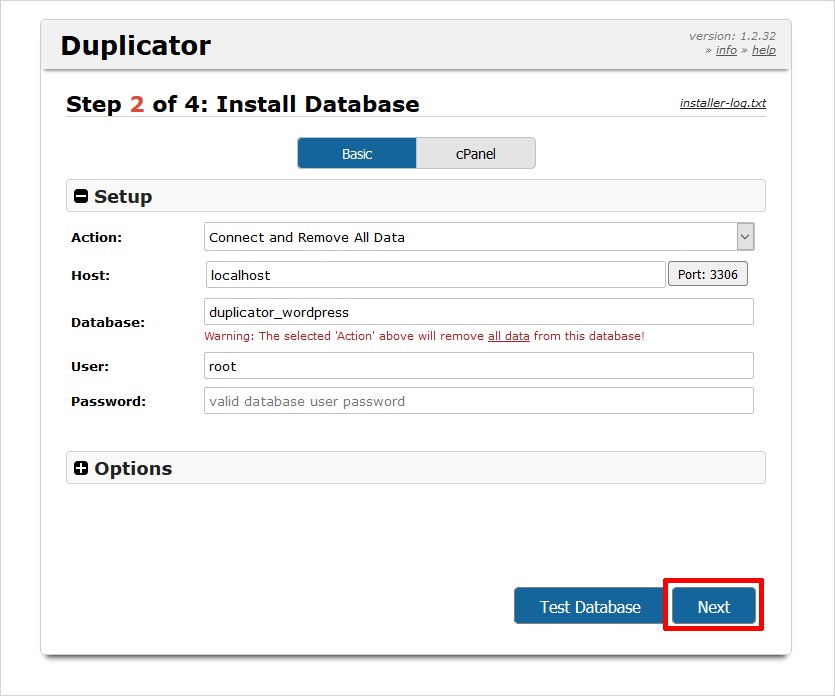
Stride 9: So, the installer interface will prompt you to add your MySQL details. In case, you lot are only replacing an existing site, you will enter the existing database details. If yous're creating a new site, click "Create New". And then, enter fresh database details. Brand sure that you become a "Success" message for both the "Server Continued" and "Database Plant" tests earlier moving on.
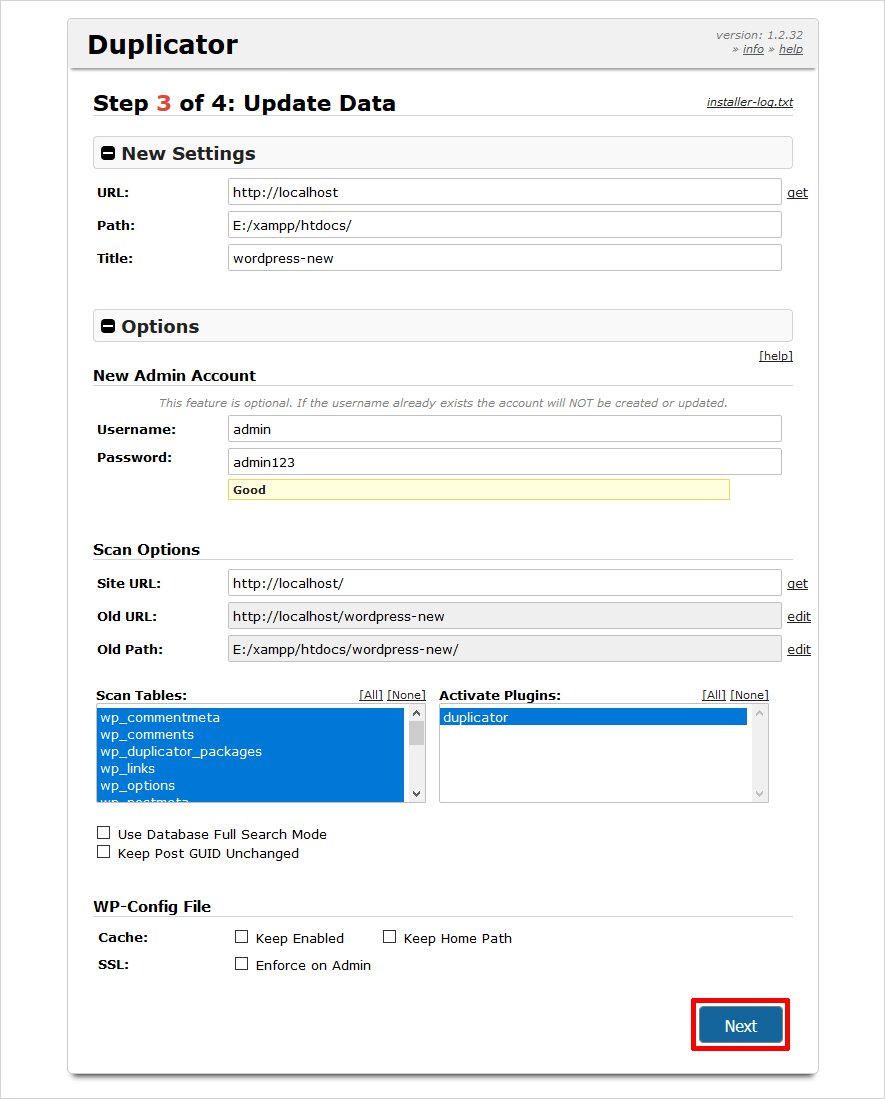
Step 10:. Side by side, it will Update Data for your live site.
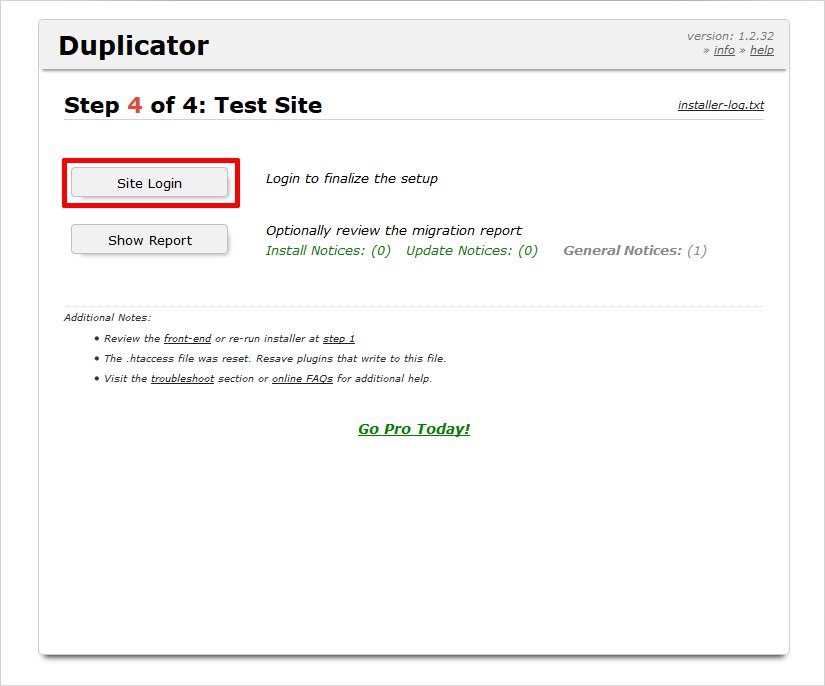
Step 11: Your site is set and you can examination it by opening the forepart-end of your live site to check that everything is working fine.
That's it !!
Which way you use to Move WordPress from Localhost to Live Server?
Every bit you have seen, it is non that tough to movement a WordPress site from localhost to a live server. It takes only a few steps to do all manually. Though using plugins, it is quite simpler. Only, you should have enough knowledge to how to move WordPress from localhost to live server manually. When you are bearing the same pain to design a WordPress website, examination it, and and then to brand information technology alive, it should look cute and competitive enough. But, you need not struggle more for making an awesome site every bit you can rely on our WordPress theme Architect. It volition create amazing WordPress website themes for your site with all the latest web design functionalities. You don't have to write a single line of code, merely elevate and drop to go your site prepare inside no time. Bank check out our best WordPress hosting providers, WordPress themes. Then, step frontward to a smooth journey of website evolution !!
Related reading: WordPress 101 tutorial
How to check WordPress version
How to find WordPress login url
How to install WordPress
What WordPress theme is that
How to change WordPress language
How to create WordPress custom login page
How to create WordPress theme from scratch
How to fix WordPress page update non working
Source: https://blog.templatetoaster.com/move-wordpress-localhost-to-live-server/
0 Response to "how to upload my website online after design with wamp offline"
Post a Comment